Blog Archives

Simple Heatless Curls

Image
Simple Heatless Curls

As a woman, I do tons of things to my hair to cause damage to it. I am always looking for something new and cute to with with my daughter’s hair without damaging it and I found something that totally works.

Things You’ll Need:

Plastic straws

wet hair or spray bottle

comb or brush

STEP 1: Make sure hair is wet

STEP 2: Lay straw horizontally at the end of hair and roll tightly until straw with rolled hair reaches scalp

STEP 3: Tie Straws

STEP 4: Let hair dry (I usually do this before bed so they can just sleep in the straws)

STEP 5: Unroll straws and separate curls

You can use hairspray if you want after you have the hair in place where you want it, either way the curls will stay.

For looser bigger curls, use bigger sections of hair. For smaller tighter curls, use smaller sections.


Chorizo Chili YUM!!!

Image
Chorizo Chili YUM!!!

Tired of the same ol’ chili recipe? This one is liable to knock your socks off!!!! I made a huge pot and we ate on it for days. It’s awesome on a cold day, or whenever!!

Ingredients:

1 pound of lean ground beef
2 fresh chorizo sausage links, casings removed (about 1/2 pound)
1 yellow onion, diced
1 teaspoon of minced garlic
2 chipotle peppers in adobo sauce, chopped (omit if you want the chili less spicy)

2 cans of kidney beans
1 15 oz. can of tomato sauce
1 can of rotel, spicy was used but you can limit heat by using mild
1 15 oz. can of diced tomatoes
2 Tablespoons of chili powder
1 Tablespoon of cumin
Salt and pepper to taste
avocado, red onion, and cilantro optional for garnish

Directions:

1. In a medium skillet brown off beef and chorizo.

2. Drain and toss into a crock pot

3. In the same skillet add 1 tsp of fat and cook the onions and garlic just until the onion get a bit of color. You can skip this step if you like and just throw it into the crock pot. I just like giving the onions a bit of color before putting them in the crock pot.

4. Add remaining ingredients, stir together, and cook on low for 8 hours or high for 4-6.

5. Garnish with diced avocado, minced red onion, and cilantro

EASY Chicken Marsala

Image
EASY Chicken Marsala

I love to cook. I often don’t have time with a huge demanding family, so the crockpot is ideal. This recipe is so delicious that I have to double or triple it because we all love the sauce so much… (Even the kids).

Ingredients:

4 Boneless Skinless Chicken Breasts
1 Cup of Flour (or Gluten Free flour mix)
3 Tbsp Olive oIl
2 oz prosciutto (or bacon)
8 oz sliced mushrooms
⅓ cup dry marsala wine (or chicken broth)
⅓ cup Chicken Broth
¼ cup chopped fresh parsley

Instructions:

Place flour in shallow bowl and season with salt & pepper.
Coat the chicken evenly with the flour, shaking off the excess.
Heat the olive oil in a large skillet over medium heat. Brown the chicken on both sides. Working in batches so you don’t over crowd the pan.Transfer to crock pot once browned.
In the same skillet place another 1 tbsp of olive oil and the prosciutto until it becomes crisp. Remove prosciutto onto paper towels.
Add mushrooms to skillet and cook until they begin to brown. Once brown stir in wine and broth, scraping up the browned bits of prosciutto stuck to the pan.
Pour the mushroom and wine sauce over the chicken in the crock pot.
Cover and cook on low for about 4 hours
Top with the cooked crumbled prosciutto and chopped parsley.

If you’d like to double, triple, or quadruple the recipe… You can!! It’s still amazing 🙂

Burlap Giftwrap Bows DIY (easy)

Image
Burlap Giftwrap Bows DIY (easy)

These little bows are different, easy, and so cute. You can even alternate a piece of ribbon in between each layer to make it more colorful if you’d like!  I don’t think of myself as a crafty person but when I was able to pull these bows off, I knew that anyone can do this.

Supplies: Scissors, burlap, Glue, glue gun, and lighter.

You’ll wan’t to cut 7 strips of burlap making each on about 1/2 to 3/4 inch thick.

The length of the strips should be as follows. 2: 10″ long, 2: 9″ long, 2: 8″ long, and 1: 4″ long.

Glue all the strips into figure 8 but don’t glue the smallest strip yet. Starting with the 2 10″ figure 8’s, glue together making an “x”, glue another “x” with the 9″ pieces on top of the 10″ pieces, and do the same with the 8″ pieces. Make a circle out of the 4″ bow and glue, then glue that to the middle so the bow is complete!

HEAVENLY PEANUT BUTTER BALLS

Image

e484957fc1b8914ac8ba8483336f5bfeSMOOTH PEANUT BUTTER BALLS

This no bake recipe is simply amazing!! My favorite thing in the world is chocolate and peanut butter mixed together, Can you get any better than that?! This is a total MUST on my holiday goodie making list.

INGREDIENTS:

-½ cup creamy peanut butter (substitute other nut butters, if needed)

-3 tablespoons salted butter, softened

-1 cup+ powdered sugar

-8 ounces semi-sweet chocolate (chopped), semi-sweet chocolate chips, or dark chocolate kisses.

INSTRUCTIONS:

*Mix peanut butter and butter together in a mixing bowl.

*Gradually stir in powdered sugar until combined well into a dough ball. If needed, add more powdered sugar a little at a time until mixture holds together in a large ball.

*Cover and let peanut butter dough sit for about 15 minutes to firm up, or cover tightly with plastic wrap and refrigerate until ready to form balls.

*Shape into 1-inch balls, place on a baking sheet, cover and refrigerate for at least 20 minutes to allow to firm up. Dough balls should hold shape before dipping in chocolate. Add more refrigeration time if necessary.
*Melt chocolate according to package instructions.

*Dip peanut butter balls one at a time into melted chocolate, allowing excess to drip off.

*Place on waxed paper lined baking sheet, cover and refrigerate until ready to serve.

NOTES:

Before beginning, make sure  you have room for a cookie sheet on one of the shelves in the fridge. COOLING IS VERY IMPORTANT FOR THIS RECIPE!!

GOOEY POPCORN BALLS

Image

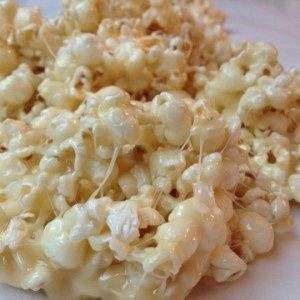
349629e53147742b45a868445cd76742My entire family loves popcorn balls. We normally buy them in the stores around halloween. This year, we couldn’t find any in our local stores so we took it upon ourselves to make some! This recipe is quick and easy AND can totally be assembled by kids!

INGREDIENTS:

-1 bag (82.3 g each) Butter Microwave Popcorn (I used popcorn seeds and made them old school on the stovetop)

-1/4 cup butter

-4 cups miniature marshmallows

-1 teaspoon vanilla extract

DIRECTIONS:

*Prepare popcorn according to package directions.

*Transfer popped kernels to large heatproof bowl, being careful to remove all unpopped kernels; set aside.
*Place butter in medium microwave-safe bowl. Microwave on HIGH 30 seconds or until melted.

*Add marshmallows; microwave 90 seconds more (marshmallows will appear puffed).

*Add vanilla and stir well with heatproof spatula.

*Pour marshmallow mixture over popcorn; stir to coat.

*Form popcorn mixture into 2-1/2-inch balls, rolling firmly by hand.

NOTES:

You can jazz these babies up a bit if you’d like. I like to drizzle melted chocolate over the top of the ball. You can also add food coloring to the melted marshmallows, or even sprinkles to the popcorn before forming the balls. My daughter put M&M’s in hers! GET CREATIVE!

Homemade Peanut Butter Blossoms

Image

143-85140-peanut-blossom-1416960830Peanut Butter Kiss Cookies!!!

So, all through the year I TRY to keep healthy and watch my food intake so that I can counteract that by all of the holiday season eating that I’m completely anticipating. Peanut butter is one of my all time favorite flavors, and when you put peanut butter and chocolate together, you have a party in your mouth! The recipe for these delicious little creatures is totally simple. The cookies are chewy and soft, which is what most people look for in a cookie. With that being said, LET’S DO THIS:

INGREDIENTS:

1 cup butter, softened
1 cup sugar
1 cup brown sugar
⅔ cup peanut butter
2 tsp vanilla
2 eggs
1 tsp. baking soda
½ tsp. salt
3½ cups flour
1 bag chocolate kisses

INSTRUCTIONS:

-Cream Butter and sugars together in a large bowl.

-Add peanut butter and mix well.

-Add eggs and vanilla and beat until well combined.

-Add baking soda, salt, and flour and mix until well incorporated.

-Roll into 1 inch balls and then roll each bowl into sugar.

-Place on greased cookie sheet and bake at 350 degrees (F) for 8 minutes.

-Immediately when done baking, gently press a chocolate kiss into the center of each cookie.

-Make sure cookies are completely cool before transferring them.

NOTES:

If you are a skeptic when it comes to making new recipes, divide all of the ingredients by 1/2 that way you don’t destroy a gigantic batch of precious dough! -LOL- The last step is optional, if you don’t want to wait on your cookies to cool, then don’t! All it takes is a steady hand and a firm spatula 🙂 ENJOY!